How to Make Changes in a Created Company in Tally | Steps To Follow in 2024

Tally is a widely used accounting software in India and worldwide, renowned for its user-friendly interface and robust features. One of the essential functionalities of Tally is the ability to make changes to a company that has already been created. Our dedicated expert team from FileWithCA provides a detailed, step-by-step guide on how to make changes to a created company in Tally, ensuring that you can manage your accounting data accurately and efficiently.
Understanding the Basics of Tally
Contents
Before diving into the process of making changes to a company in Tally, it’s important to understand the basic structure and functionalities of the software:
- Company Creation: In Tally, a company refers to the main entity for which you manage the accounts. When you create a company, you set up its basic details such as name, address, financial year, and currency.
- Gateway of Tally: This is the main screen in Tally, where you access all the features and functionalities. From here, you can navigate to various sections such as Accounts Info, Inventory Info, and more.
- Alteration: Tally provides an alteration feature that allows you to modify the details of existing entities, including companies, ledgers, and vouchers.
Step-by-Step Guide to Making Changes in a Created Company in Tally
Here’s a comprehensive guide on how to make changes to a created company in Tally:
Step 1: Open Tally and Select the Company
- Launch Tally: Open the Tally software on your computer. You will be greeted by the Gateway of Tally screen.
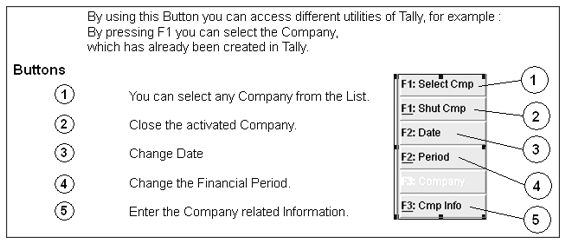
- Select the Company: From the Gateway of Tally, select the company you want to make changes to. If the company is not already selected, go to
Select Companyand choose the appropriate company from the list.
Step 2: Access the Alteration Mode
- Navigate to Company Info: On the Gateway of Tally screen, press
Alt+F3or click onCompany Infofrom the menu. This will open the Company Info menu, where you can manage various company-related tasks. - Select Alter: In the Company Info menu, choose the
Alteroption. This will bring up a list of companies you have created in Tally.
Step 3: Choose the Company to Alter
- Select the Company: Select the company you want to alter from the list of companies displayed. You can do this by navigating to the company using the arrow keys and pressing
Enter.
Step 4: Make the Necessary Changes
Once you have selected the company to alter, you will be taken to the Company Alteration screen. Here, you can make various changes to the company details. Below are some common changes you might need to make:
- Company Name: If you need to change the company name, simply update the
Namefield with the new name. - Mailing Name and Address: Update the mailing name and address if there are changes in the company’s contact information.
- Financial Year and Books Beginning: Modify the financial year and the date when the books begin if there are changes in your accounting period.
- Security Control: You can enable or disable security features and change the password settings if necessary.
- Base Currency Information: If there are changes in your base currency, update the relevant fields to reflect these changes.
- Email and Other Contact Details: Update the email address and other contact information as required.
Step 5: Save the Changes
After making the necessary changes to the company details, save the changes:
- Accept the Changes: Press
Ctrl+Ato accept and save the changes. Alternatively, you can navigate toAcceptthe bottom of the screen and pressEnter. - Confirmation: Tally will save the changes and return you to the Company Info menu or the Gateway of Tally, depending on your previous screen.
Additional Alteration Options
In addition to altering the basic company details, Tally allows you to make changes to various other components associated with the company:
Altering Ledgers
- Access Ledger Alteration: Go to
Gateway of Tally > Accounts Info > Ledgers > Alter. - Select the Ledger: Choose the ledger you want to alter from the list.
- Make Changes: Update the ledger details such as name, group, and opening balance.
- Save Changes: Press
Ctrl+Ato save the changes.
Altering Vouchers
- Access Voucher Alteration: Go to
Gateway of Tally > Display > Daybook. - Select the Voucher: Choose the voucher you want to alter by navigating through the daybook.
- Alter Voucher: Press
Enterto open the voucher, make the necessary changes, and then save the alterations by pressingCtrl+A.
Altering Inventory
- Access Stock Item Alteration: Go to
Gateway of Tally > Inventory Info > Stock Items > Alter. - Select the Stock Item: Choose the stock item you need to alter.
- Make Changes: Update the stock item details such as name, units, and opening balance.
- Save Changes: Press
Ctrl+Ato save the changes.
Important Tips for Altering Company Details in Tally
- Backup Data: Before making any significant changes, it is advisable to back up your Tally data. This ensures you can restore the original data if anything goes wrong.
- Double-Check Changes: Verify the changes before saving them to avoid errors.
- User Permissions: Ensure you have the necessary permissions to alter company details. You might need authorization to make certain changes if you are not an administrator.
- Regular Updates: Keep Tally updated to the latest version to benefit from new features and improvements in functionality.
Conclusion
Making changes to a created company in Tally is a straightforward process once you understand the steps involved. Following the step-by-step guide in this article, you can easily update company details, alter ledgers, modify vouchers, and manage inventory records. Always remember to take necessary precautions such as backing up data and verifying changes to maintain the integrity of your accounting information. With these practices, you can efficiently manage and update your company details in Tally, ensuring accurate and up-to-date financial records.


Leave a Reply